Final Result
Since I'm getting married in July, I was inspired to make a fun project that stemmed from some of the decor I've encountered on several different websites and Pinterest boards. After finding things like this, I decided I wanted to make my own! However, I didn't want to make it entirely wedding related and I wanted users to be able to change it based on their preferences, so I made a Firebase app that allows anyone to change the centerpiece to their favorite color or one of the preset themes that also play music on their device and start the light show when clicked.
Materials
- Adafruit ESP32 Feather (HUZZAH32)
- Five Neopixel LED Strips (with adhesive tape attached)
- Five Female / Female Jumper Wires
- Five 470 ohm resistors
- USB cable
- Portable 5V battery
- 3D modeled centerpiece / translucent container to contain wires, LED strips, and Huzzah
Designing and Fabrication
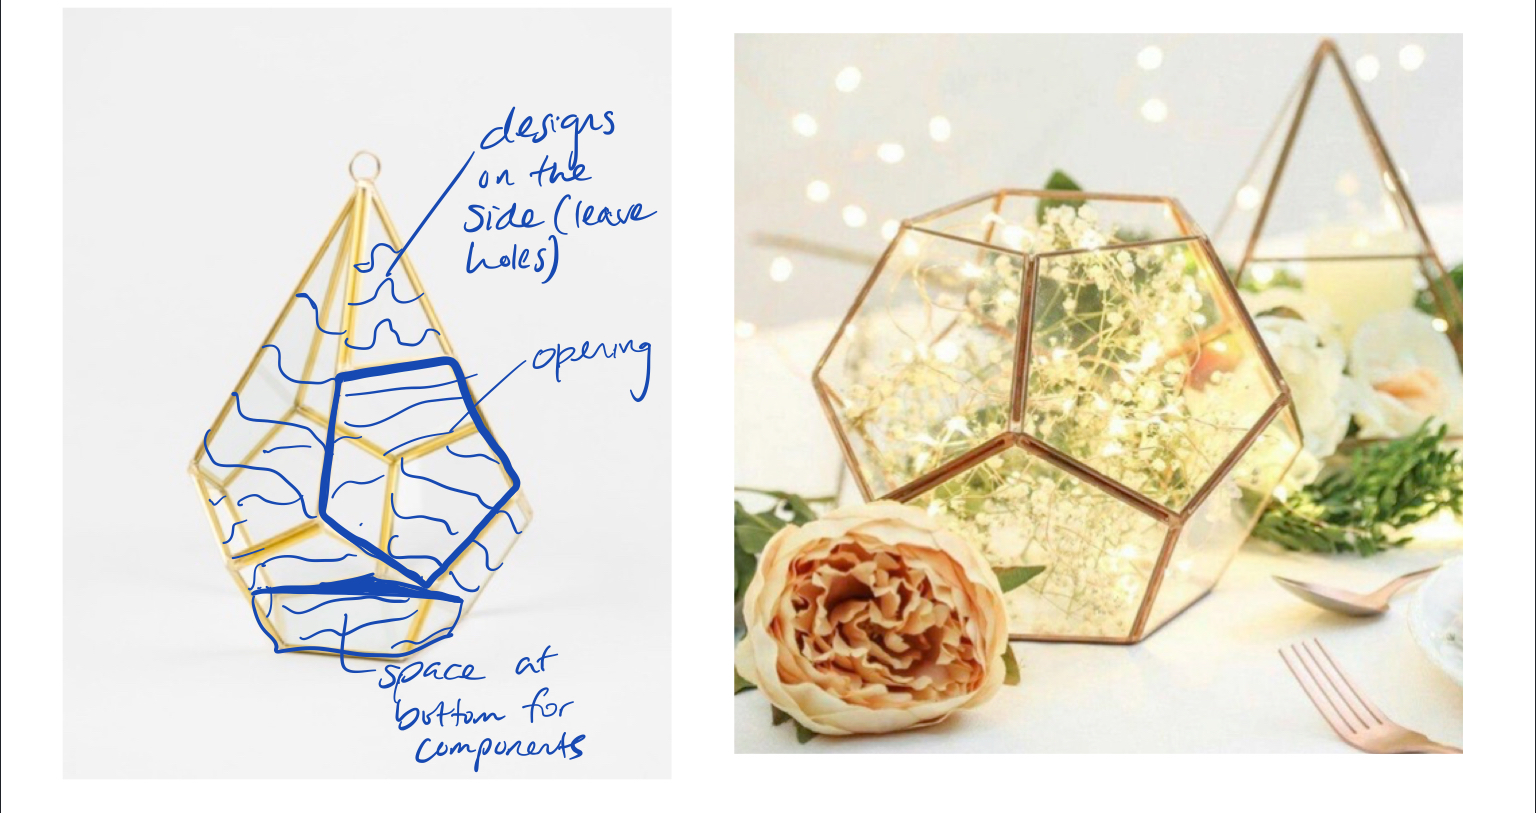
I first started by working on a model for my final project. Here is some more inspiration for the project!
I started working on some sketches and inital thougths for what I wanted my design to look like and how I planned on adding the Arduino and additional components to the design. Where will I fit the Arduino? How many components will I need to create a light show and what are their dimensions?
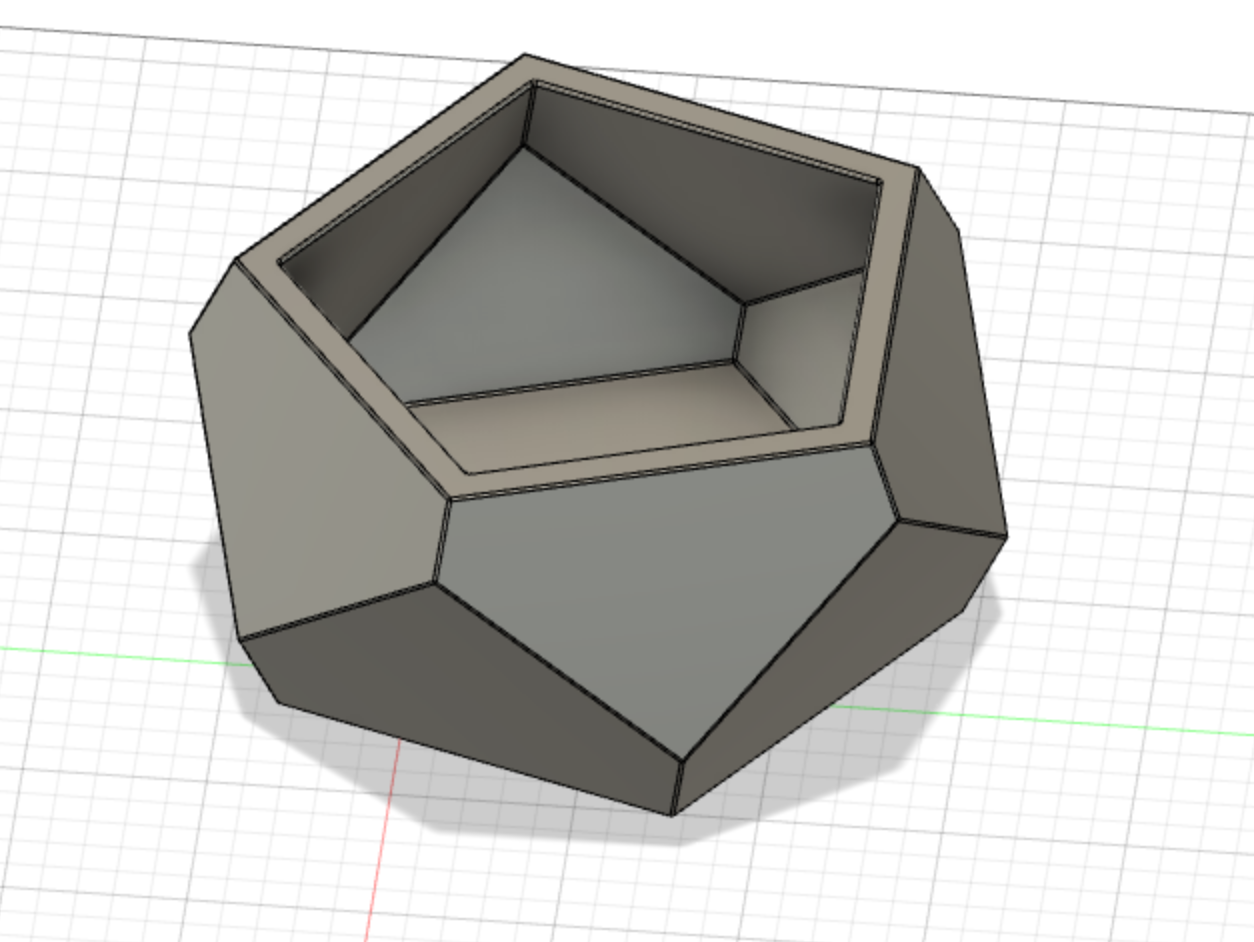
I found this tutorial on making geometric 3D shapes in Fusion 360, so I figured I would try to explore this more and build my design off of that. I also did some preliminary measurements and found that 80mm for each side would be a good place to start. I used parametric modeling just in case I want to change the dimensions later.
This is what I designed using the helpful tutorial on the forum!
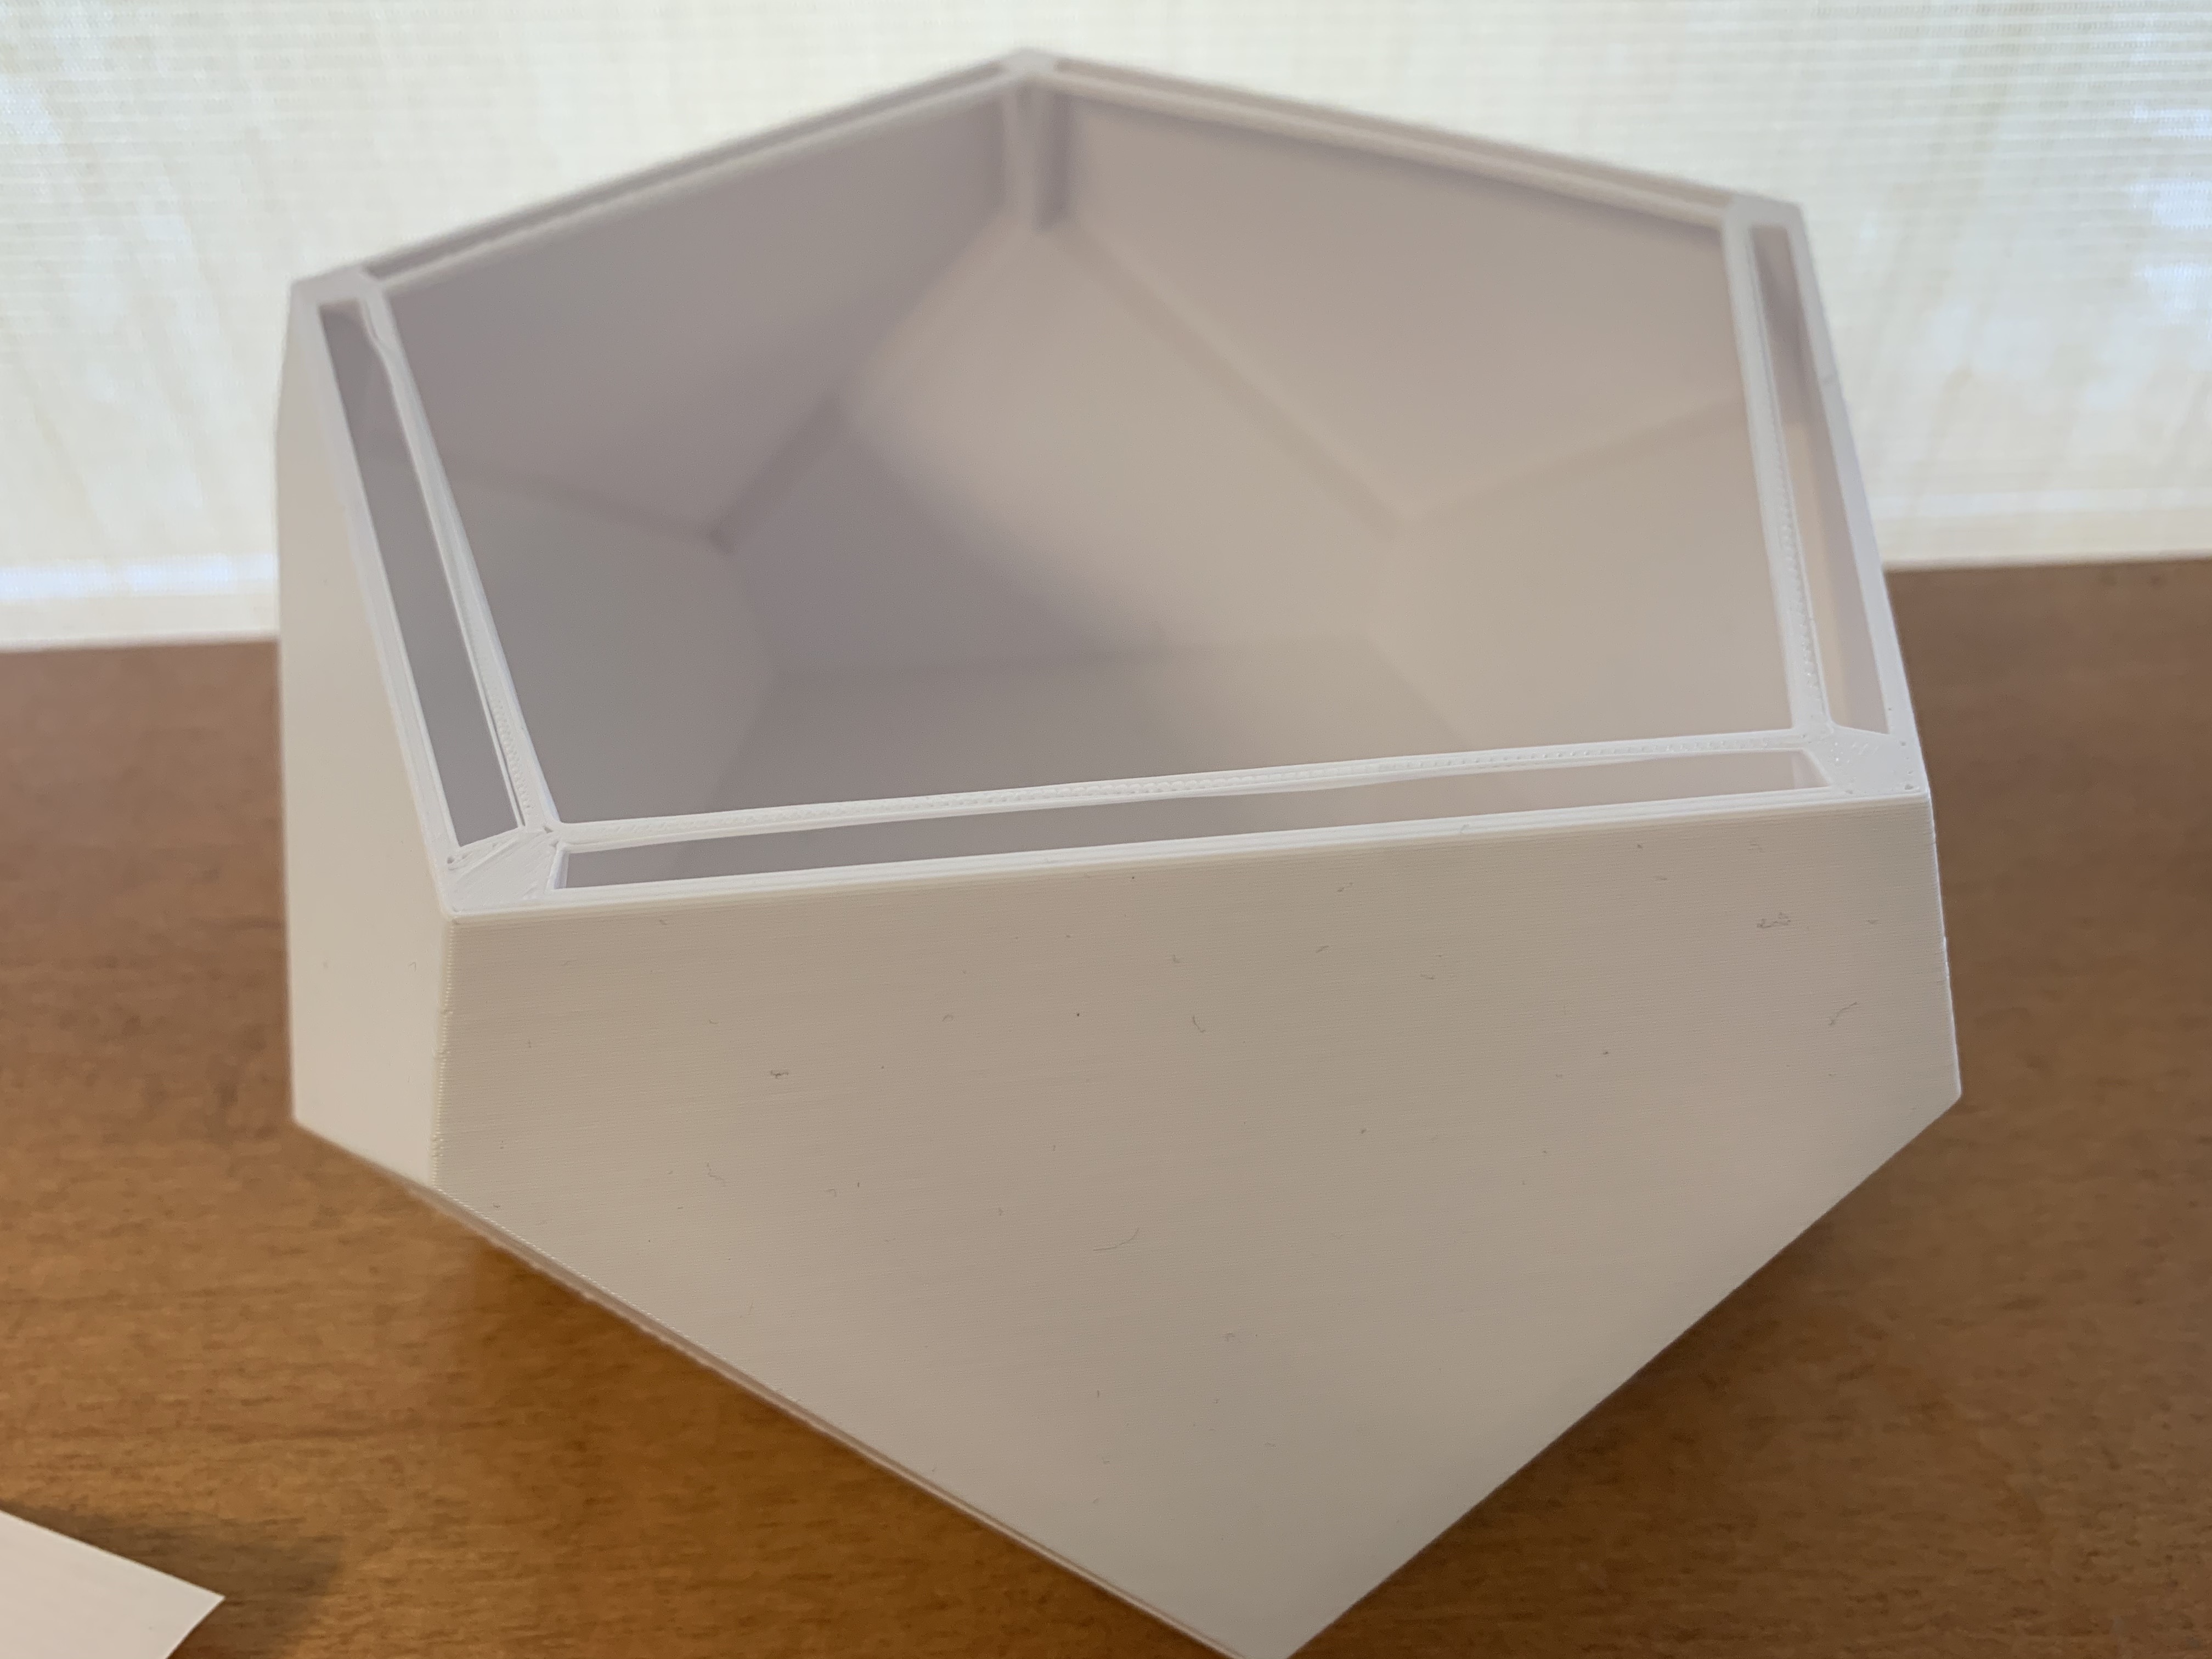
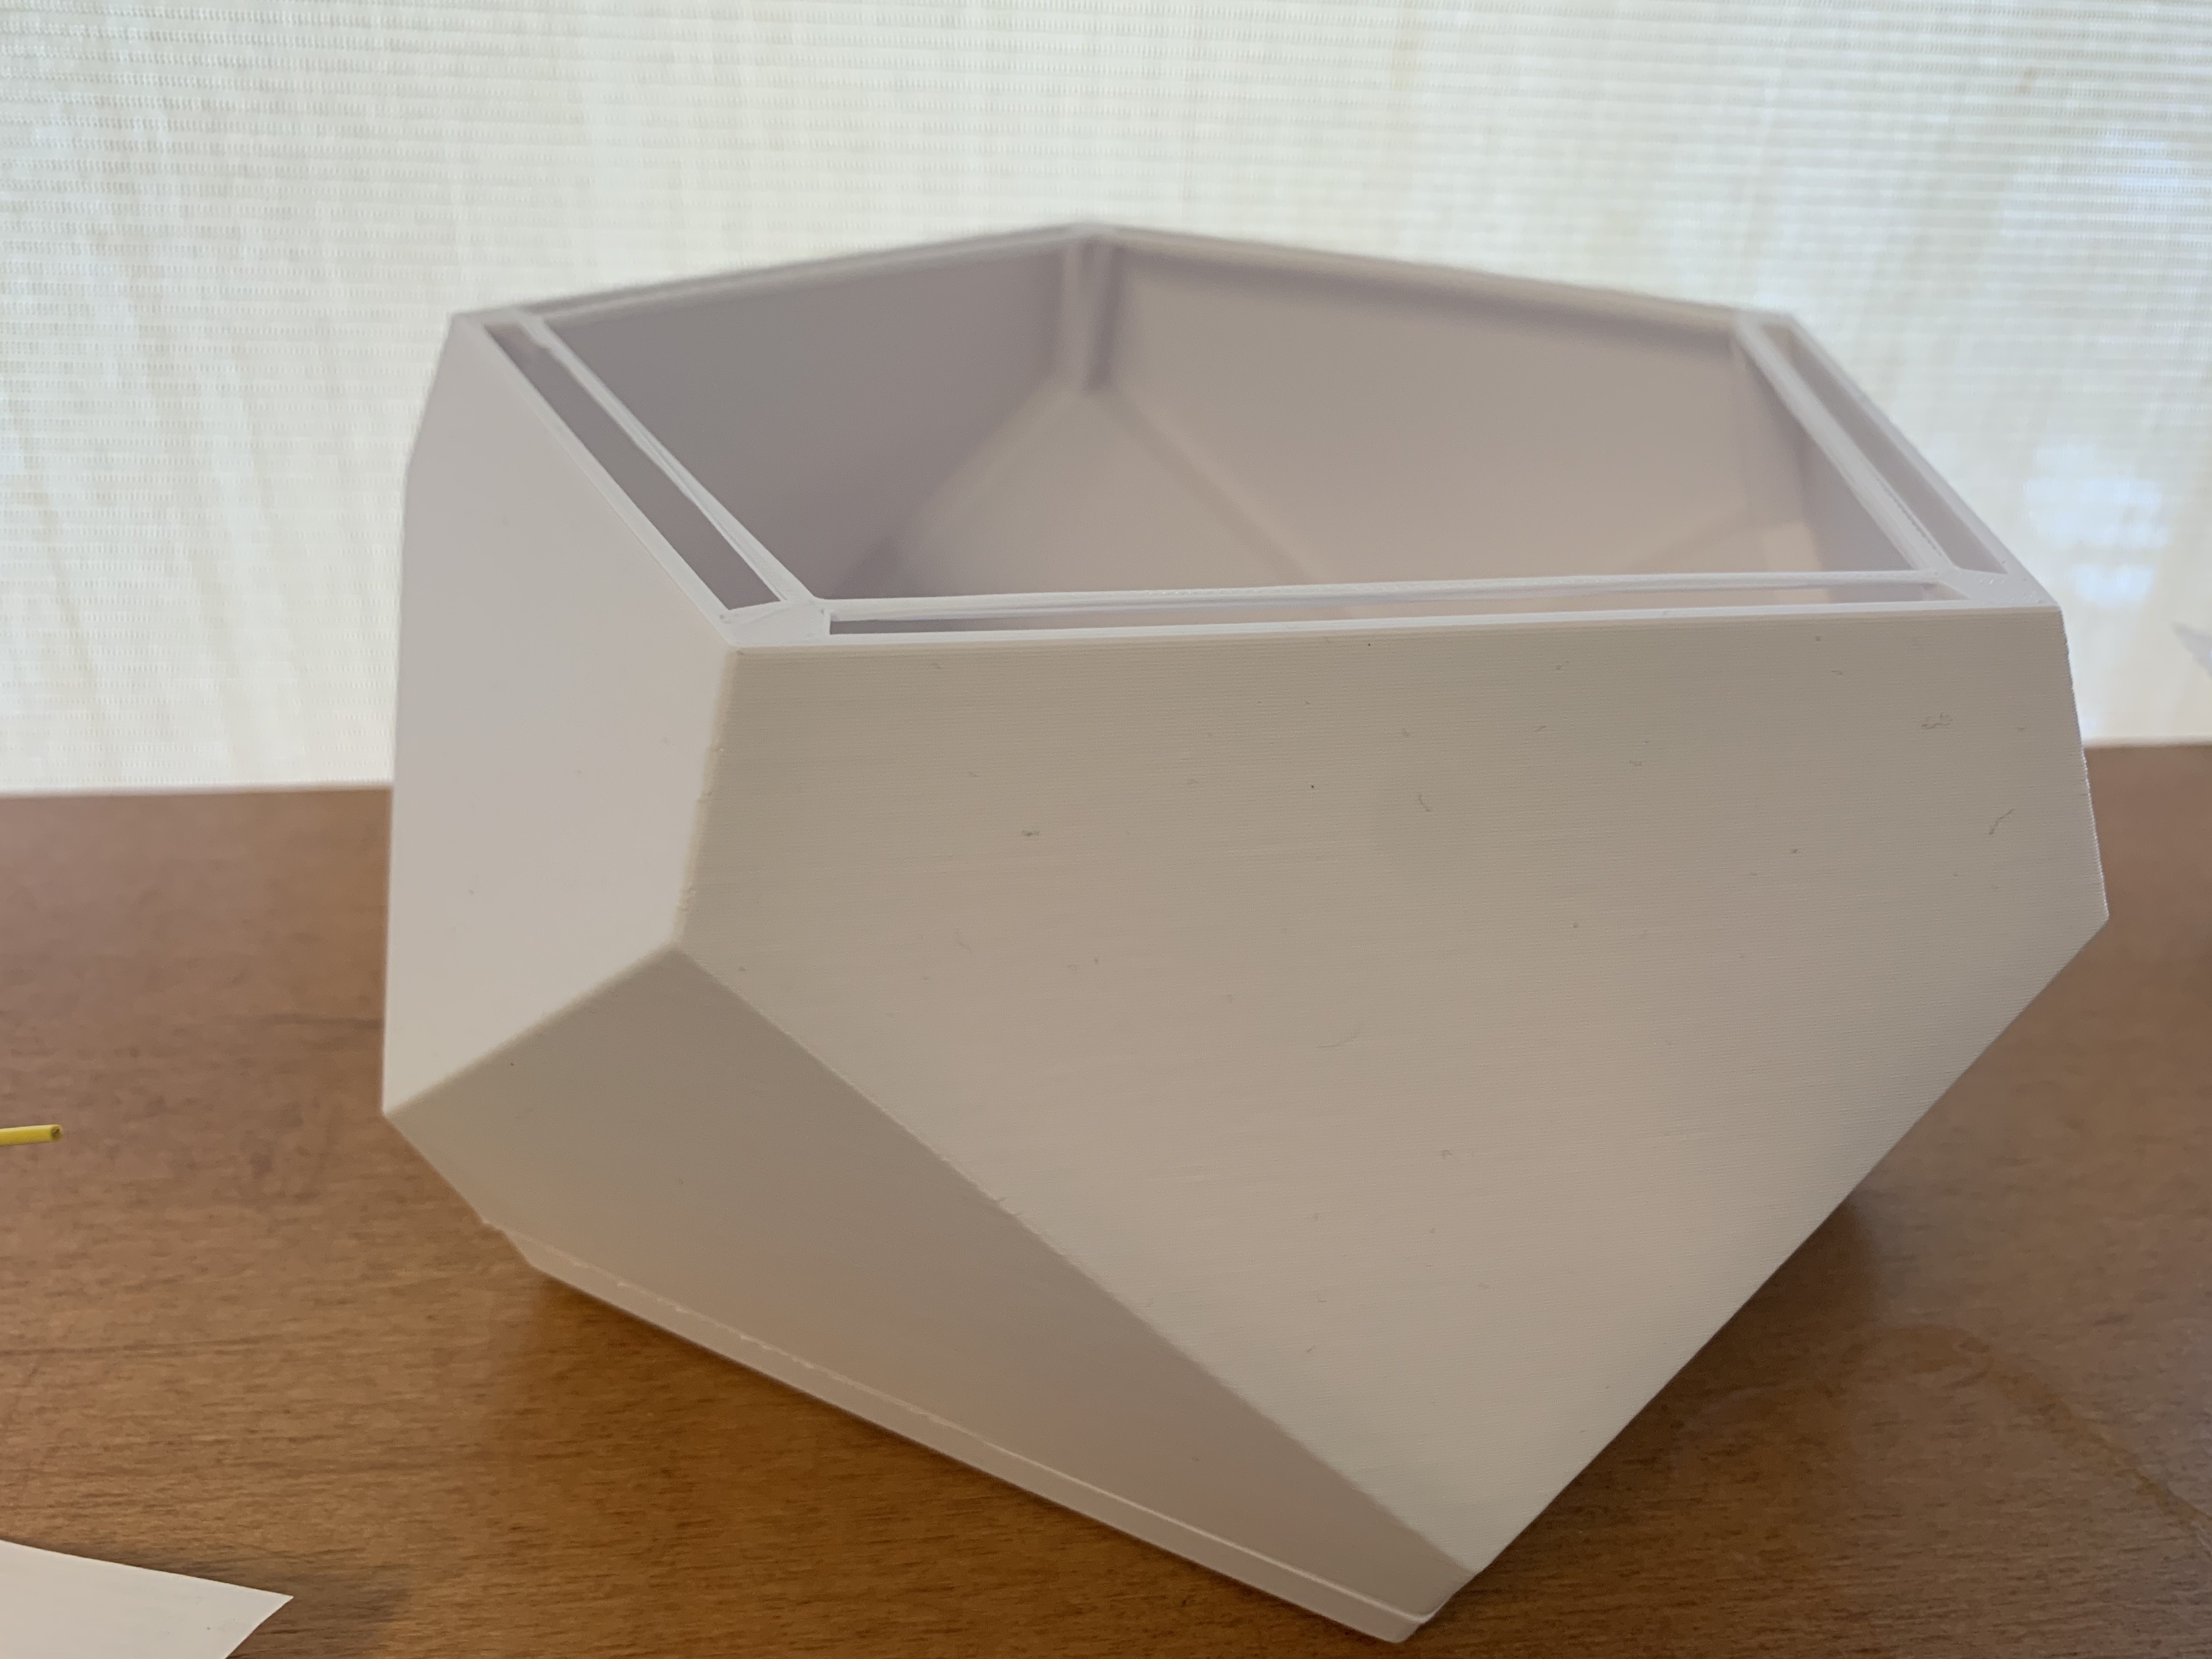
After some helpful input in lab about the designing the model to best contain my devices and LED Strips by extruding some of the sides so I could secure the strips to the side of the model, my final 3D print looked like this:
Download my G-code file here.
Download my STL file or see the STL file here.
Wiring the LED Strips Inside the Centerpiece
I first wanted to connect one LED strip to the Huzzah and then extend the wiring and code to the five LED strips. I looked at this link for a reminder on how to wire LED strips, and here for the Adafruit HUZZAH32-ESP32 Feather pinouts. After wiring the power on the strip to USB on the Huzzah, GND to GND, and Din to GPIO #13, I made sure the NeoPixel library was installed using the Library Manager and loaded the strandtest example (File -> Examples scroll down to Adafruit Neopixel -> strandtest).
Now it's time to wire all five LED strips! After sticking them to the 3D model using the strips' adhesive tape, I connected the power on the strips to the USB pin on the Huzzah wired to the positive side of the breadboard, GND to GND and the negative terminal on the breadboard, and used female/female jumper wires to connect the Din wire on the strips to a 470 ohm resistor which I connected to pins on the Huzzah. I used GPIO pins 12, 27, 33, 25, and 4 to do this. I connected the USB cable to my computer when I was uploading code, but the USB on the final product is connected to a portable 5V battery.
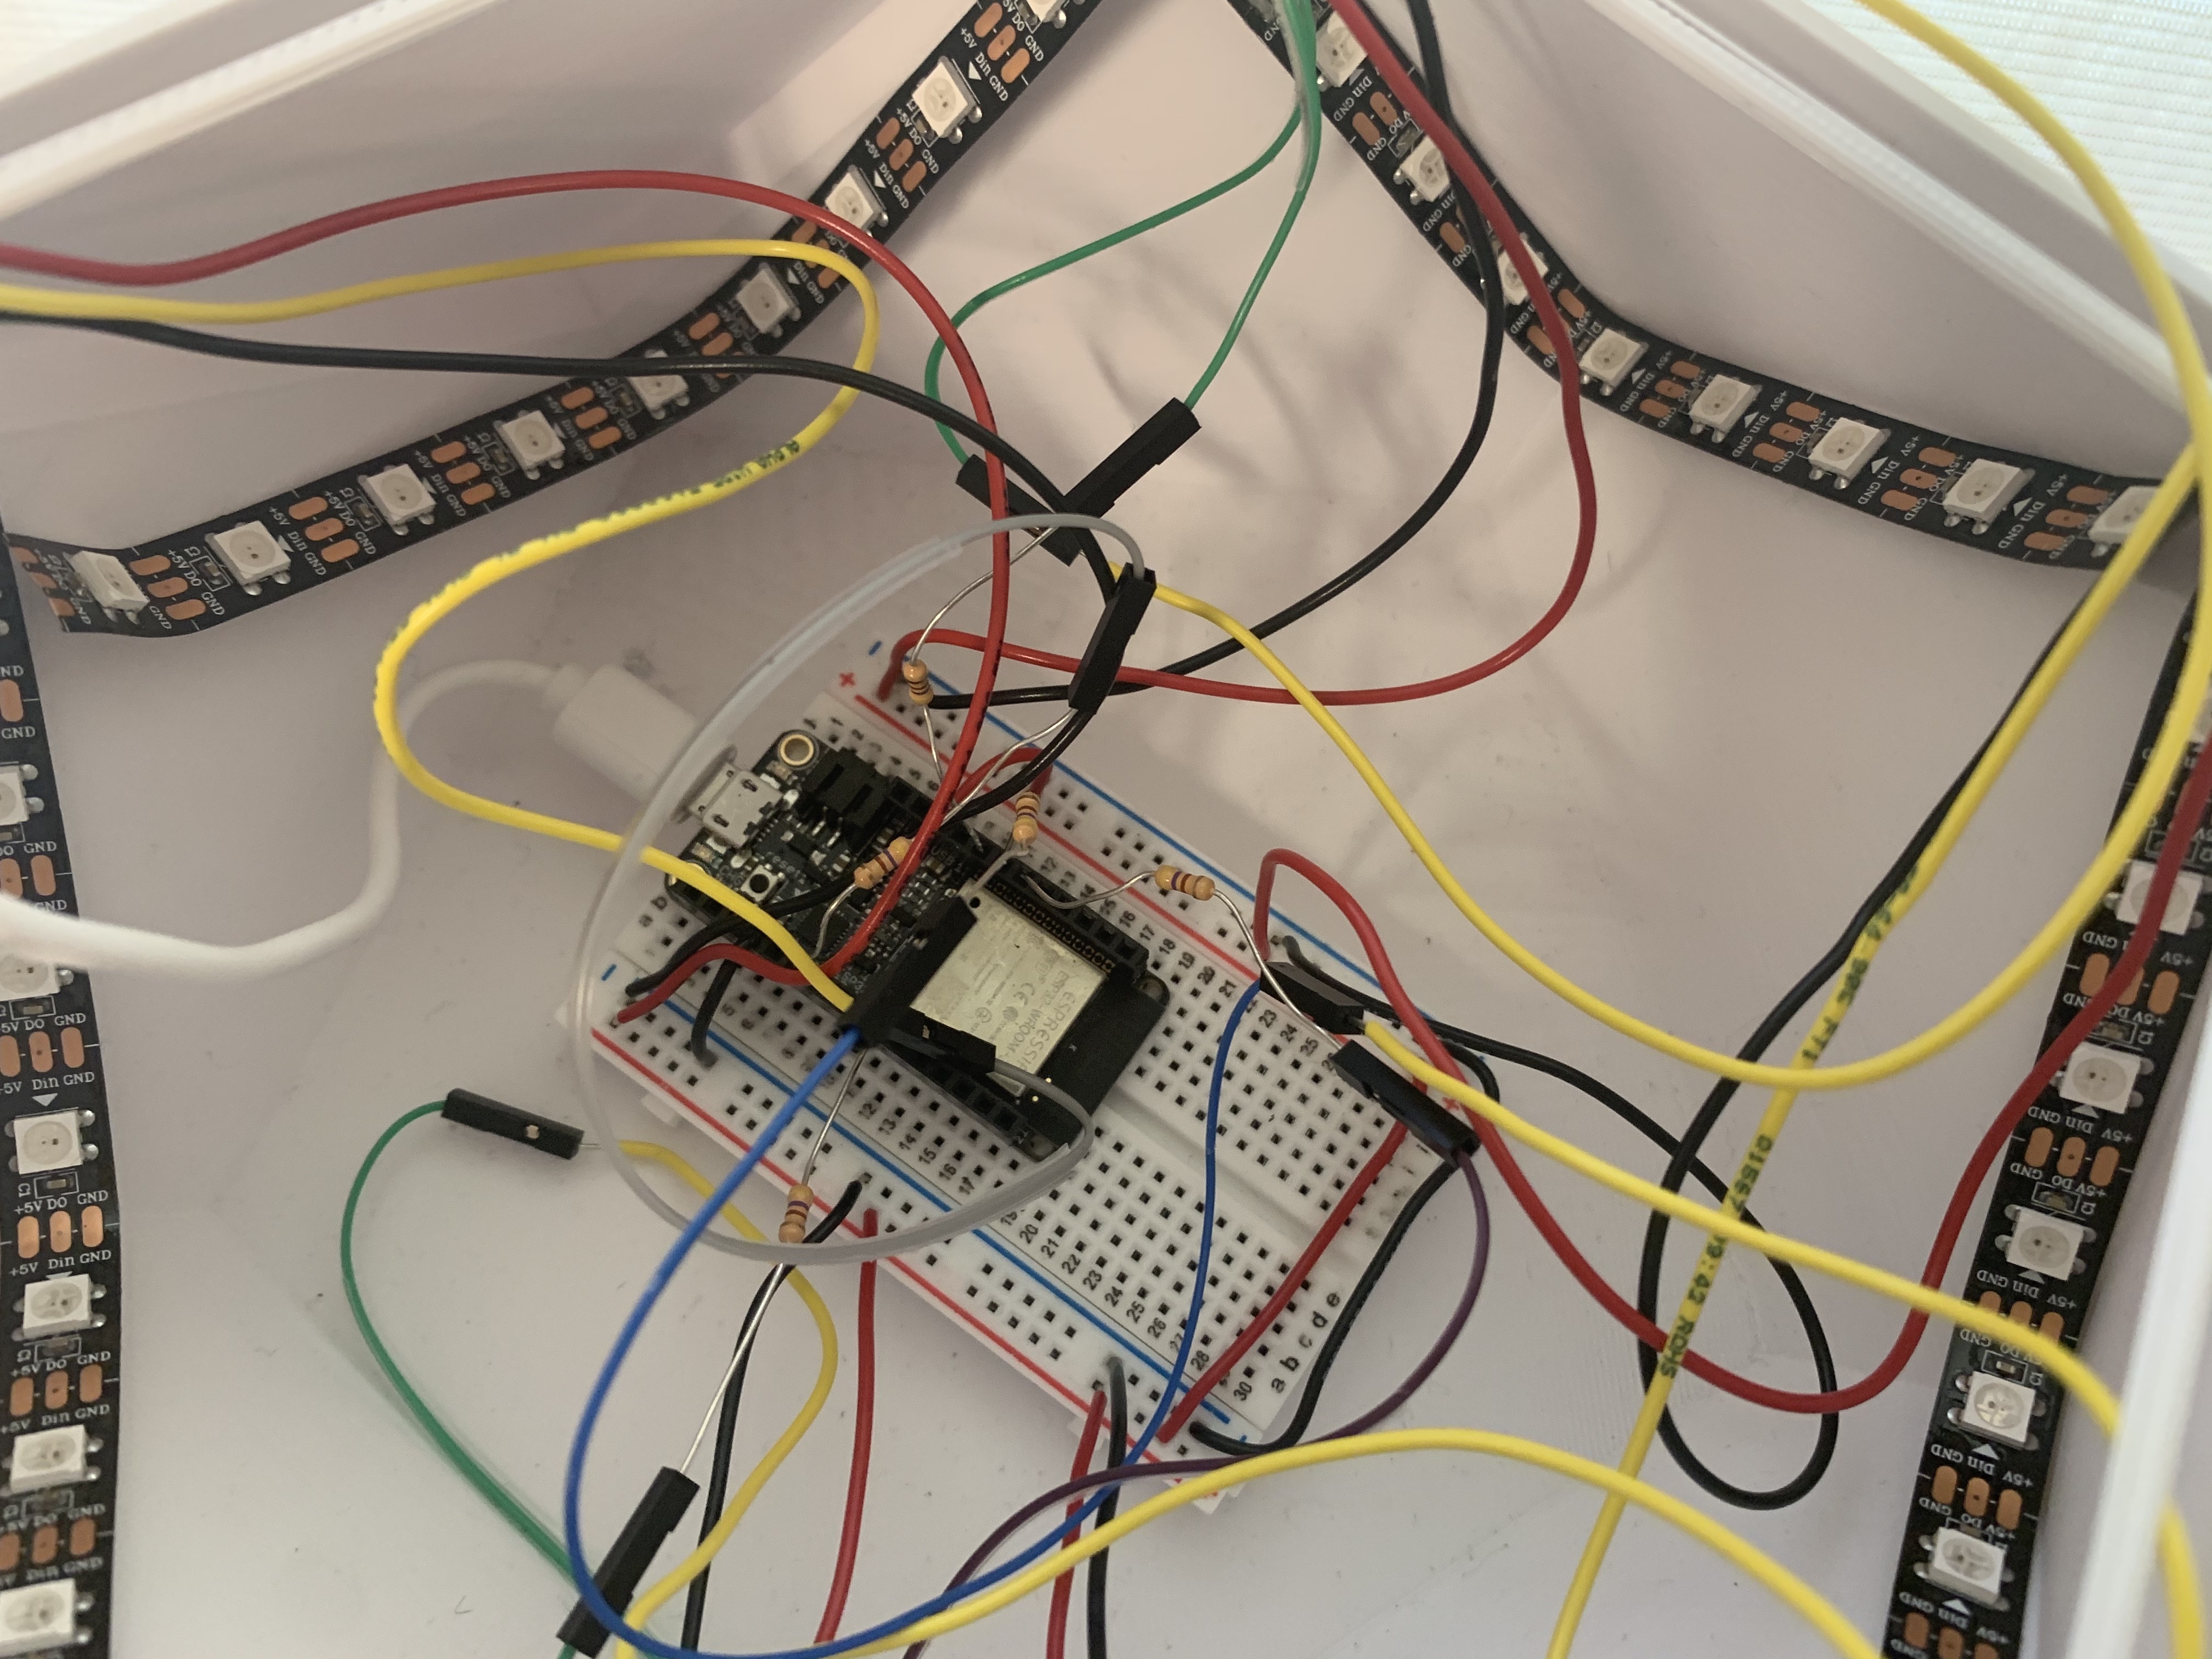
All of my LED strips were not working on the first attempt, which I later found may have been because a few of the wires that were soldered on to the LED strips got loose and fell off of the strips. After replacing a couple of the LED strips and ensuring that the newly soldered wires were secure with hot glue (thanks to Nathan), I was able to get all of the LED strips to work!
See LED Strips 1 and LED Strips 2 for my first couple attempts using the LED strips within my model.
See this code that initializes five LED strips and uses the colorWipe function from the strandtest code included in the Adafruit Neopixel examples:
            #include <Adafruit_NeoPixel.h>
            #ifdef __AVR__
                #include avr/power.h
            #endif

            #define PIN1 12
            #define PIN2 27
            #define PIN3 33
            #define PIN4 25
            #define PIN5 34

            // Parameter 1 = number of pixels in strip
            // Parameter 2 = Arduino pin number (most are valid)
            // Parameter 3 = pixel type flags, add together as needed:
            //   NEO_KHZ800  800 KHz bitstream (most NeoPixel products w/WS2812 LEDs)
            //   NEO_KHZ400  400 KHz (classic 'v1' (not v2) FLORA pixels, WS2811 drivers)
            //   NEO_GRB     Pixels are wired for GRB bitstream (most NeoPixel products)
            //   NEO_RGB     Pixels are wired for RGB bitstream (v1 FLORA pixels, not v2)
            //   NEO_RGBW    Pixels are wired for RGBW bitstream (NeoPixel RGBW products)
            Adafruit_NeoPixel strip1 = Adafruit_NeoPixel(10, PIN1, NEO_GRB + NEO_KHZ800);
            Adafruit_NeoPixel strip2 = Adafruit_NeoPixel(10, PIN2, NEO_GRB + NEO_KHZ800);
            Adafruit_NeoPixel strip3 = Adafruit_NeoPixel(10, PIN3, NEO_GRB + NEO_KHZ800);
            Adafruit_NeoPixel strip4 = Adafruit_NeoPixel(10, PIN4, NEO_GRB + NEO_KHZ800);
            Adafruit_NeoPixel strip5 = Adafruit_NeoPixel(10, PIN5, NEO_GRB + NEO_KHZ800);

            // IMPORTANT: To reduce NeoPixel burnout risk, add 1000 uF capacitor across
            // pixel power leads, add 300 - 500 Ohm resistor on first pixel's data input
            // and minimize distance between Arduino and first pixel.  Avoid connecting
            // on a live circuit...if you must, connect GND first.

            void setup() {

                strip1.begin();
                strip1.show(); // Initialize all pixels to 'off'

                strip2.begin();
                strip2.show(); // Initialize all pixels to 'off'

                strip3.begin();
                strip3.show(); // Initialize all pixels to 'off'

                strip4.begin();
                strip4.show(); // Initialize all pixels to 'off'

                strip5.begin();
                strip5.show(); // Initialize all pixels to 'off'
            }

            void loop() {
                // Some example procedures showing how to display to the pixels:
                colorWipe_all(strip1.Color(255, 0, 0), 50); // Red
                colorWipe_all(strip1.Color(0, 255, 0), 50); // Green
                colorWipe_all(strip1.Color(0, 0, 255), 50); // Blue
            }

            // Fill the dots one after the other with a color
            void colorWipe_all(uint32_t c, uint8_t wait) {
                for(uint16_t i=0; i < strip1.numPixels(); i++) {
                    strip1.setPixelColor(i, c);
                    strip1.show();

                    strip2.setPixelColor(i, c);
                    strip2.show();

                    strip3.setPixelColor(i, c);
                    strip3.show();

                    strip4.setPixelColor(i, c);
                    strip4.show();

                    strip5.setPixelColor(i, c);
                    strip5.show();
                    delay(wait);
                }
            }
Creating my Application Using Bootstrap Studio and Firebase
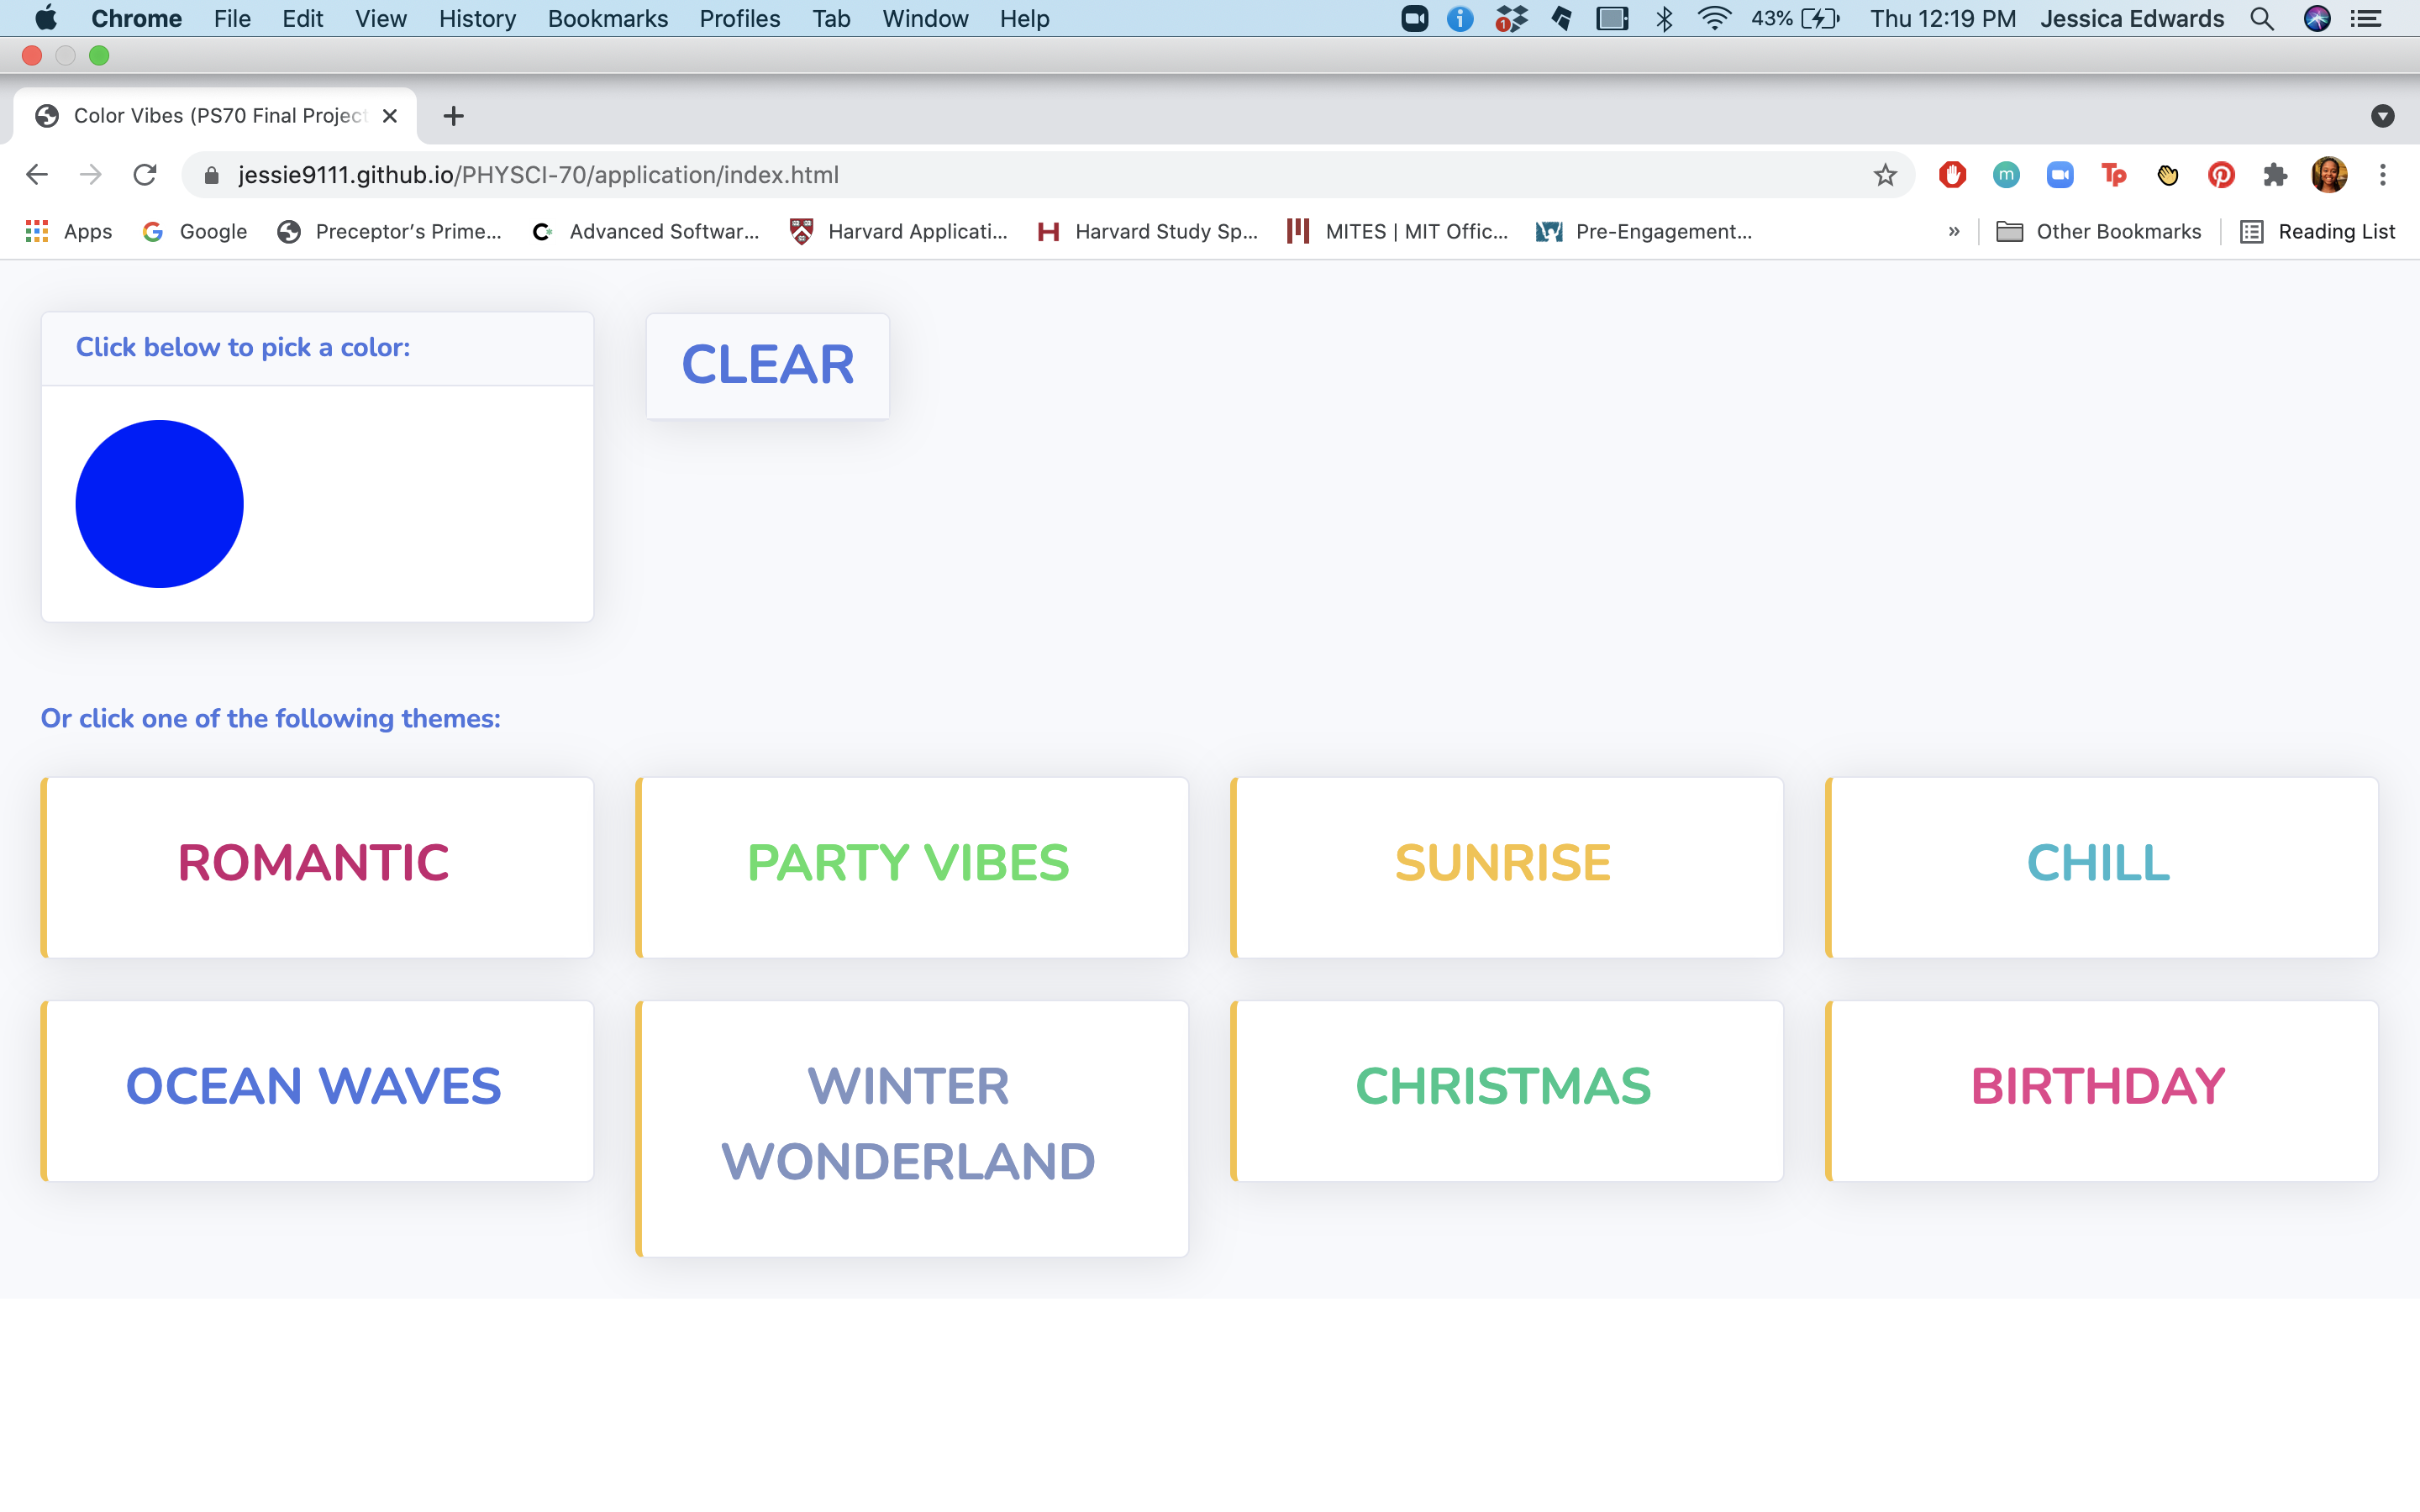
Now that I set up my hardware and ran some basic Arduino code, it was now time to build my Firebase app that I would connect. I decided to build a web application using Bootstrap Studio. My application has the following requirements:
- Color picker that allows a user to choose any color
- An off/clear button to remove the lights
- Eight buttons that trigger different themes (romantic, party vibes, sunrise, chill, ocean waves, winter wonderland, Christmas, birthday)
- Responsive webpage suitable for several types of device (laptop, phone, etc.)
Bootstrap Studio allows a user to choose various themes, drag and drop elements, and export and edit HTML code to use for their webpages. It also allows for applications to be responsive, making sure my app would look great for a computer or mobile device!
After playing around with elements on the Bootstrap Studio Editor, I exported my code so I could add the JavaScript and Firebase components.
            <script> src="https://www.gstatic.com/firebasejs/8.5.0/firebase-app.js"></script>


            <script> src="https://www.gstatic.com/firebasejs/8.5.0/firebase-analytics.js"></script>

            <script> src="https://www.gstatic.com/firebasejs/8.5.0/firebase-database.js"></script>

            <script>

            // Your web app's Firebase configuration
            // For Firebase JS SDK v7.20.0 and later, measurementId is optional
            var firebaseConfig = {
                apiKey: "AIzaSyCb8gPf3QO7K5yy58VxnyVq1L_f8-FCm3c",
                authDomain: "ps70-final-project.firebaseapp.com",
                databaseURL: "https://ps70-final-project-default-rtdb.firebaseio.com",
                projectId: "ps70-final-project",
                storageBucket: "ps70-final-project.appspot.com",
                messagingSenderId: "832560908859",
                appId: "1:832560908859:web:04b0828a96cc4f8bb0aa1e",
                measurementId: "G-TGRZE0NEZZ"
            };

            // Initialize Firebase
            firebase.initializeApp(firebaseConfig);
            firebase.analytics();

            // Get a database reference to our blog
            var ref = firebase.database().ref("/");

            var currentPlayer;
            function EvalSound(soundobj) {

                var thissound = document.getElementById(soundobj);

                if (currentPlayer  && currentPlayer != thissound) {
                    currentPlayer.pause();
                }

                if (thissound.paused) thissound.play();
                else thissound.pause();

                thissound.currentTime = 0;
                currentPlayer = thissound;

                ref.update({
                    "LED_STATUS": soundobj,
                    "COLOR": ""
                });
            }

            </script>
I loaded the above JavaScript code first in the body section of my index.html page.
I looked at this tutorial in order to build a Firebase app with a Realtime Database that would store the information from the application and send it to the Huzzah. On my Firebase console page, I looked under where it says "Get started by adding Firebase to your app" and clicked the Web icon (</>). On the next page, I made a name for my app and then copied the auto-generated configuration code into the firebaseConfig variable (click here for more information). I also made sure to load the Firebase SDK first within the Javascript code.
After adding the Firebase elements to the app, I then needed to code the changes between different themes.
I also wanted to play songs when each button was pushed that would match each of the themes.
After hours of Google searching, I finally found this link (see response)
that showed how to play a sound that stops playing when a new button is pressed. My function
EvalSound(soundobj) takes in the ID of an audio tag, plays a song if a button is pushed,
stops the current song and plays the next song when another button is pushed, and updates the Firebase
dataset with the ID name which will be received by the Huzzah.
I also had to write code for the color picker to allow the application to send a color to the database that would then be received by the Huzzah.
            <script>
                var colorPicker = document.getElementById("color_picker");
                var rgb;

                colorPicker.addEventListener("change", e => {
                    color = e.target.value;

                    ref.update({
                        "LED_STATUS": 'color',
                        "COLOR": color
                    });
                });

            </script>
With that, I had a responsive and working application with a color picker, buttons that play music, and an operating Firebase database.
Making a Lightshow using FastLED
With an up-and-running web interface, it was now time for me to pair my device with my application. I looked at a variety of methods to do this and spent a lot of time on this tutorial on Multi-tasking the Arduino and implementing Neopixel patterns. After a while, I found the FastLED library to be the most helpful. After going to Tools -> Manage Libraries and installing the FastLED library in the Arduino IDE, I went to File -> Examples -> FastLED -> ColorPalette for ideas on color palettes and changed them appropriately. SchemeColor was also a great site for finding relevant color themes.
Here is an example of a palette I made for the "Romantic theme":
            void RomanticPalette() {
                CRGB color1 = CRGB(92, 10, 60);
                CRGB color2 = CRGB(121, 21, 81);
                CRGB color3 = CRGB(245, 111, 134);
                CRGB color4 = CRGB(210, 65, 117);
                CRGB color5 = CRGB(188, 52, 118);


                currentPalette = CRGBPalette16(
                                            color1, color2, color3, color4, color5,
                                            color1, color2, color3, color4, color5,
                                            color1, color2, color3, color4, color5,
                                            color1);
            }
Connecting Everything Together
Now that I had the web interface and planned on using the color palettes through the FastLED library, it was time to combine everything and create a working final product! I went back to this Firebase tutorial again but this time focused on the Arduino code to find the libraries I should include and how to connect to Firebase. I ended up with the following code which you can download here:
    #include <FastLED.h>
    #include <WiFi.h>                                 // esp32 library
    #include <FirebaseESP32.h>                        // firebase library

    #define FIREBASE_HOST ""                                // the project name address from firebase id
    #define FIREBASE_AUTH ""                                // the secret key generated from firebase
    #define WIFI_SSID ""                                    // input your home or public wifi name
    #define WIFI_PASSWORD ""                                // password of wifi ssid

    #include <Adafruit_NeoPixel.h>
    #ifdef __AVR__
      #include <avr/power.h>
    #endif

    #define PIN1 12
    #define PIN2 27
    #define PIN3 33
    #define PIN4 25
    #define PIN5 4

    #define NUM_LEDS    10
    #define BRIGHTNESS  64
    #define LED_TYPE    WS2811
    #define COLOR_ORDER GRB
    CRGB leds[NUM_LEDS];

    #define UPDATES_PER_SECOND 1000
    long previousMillis = 0;
    long interval = 1000 / UPDATES_PER_SECOND;

    // This example shows several ways to set up and use 'palettes' of colors
    // with FastLED.
    //
    // These compact palettes provide an easy way to re-colorize your
    // animation on the fly, quickly, easily, and with low overhead.
    //
    // USING palettes is MUCH simpler in practice than in theory, so first just
    // run this sketch, and watch the pretty lights as you then read through
    // the code.  Although this sketch has eight (or more) different color schemes,
    // the entire sketch compiles down to about 6.5K on AVR.
    //
    // FastLED provides a few pre-configured color palettes, and makes it
    // extremely easy to make up your own color schemes with palettes.
    //
    // Some notes on the more abstract 'theory and practice' of
    // FastLED compact palettes are at the bottom of this file.

    CRGBPalette16 currentPalette;
    TBlendType    currentBlending;

    String led_status = "";                                          // led status received from firebase
    String hex = "";

    //Define FirebaseESP32 data object
    FirebaseData firebaseData;

    void setup() {
        Serial.begin(115200);
        delay( 3000 ); // power-up safety delay

        WiFi.begin(WIFI_SSID, WIFI_PASSWORD);                          // try to connect with wifi

        Serial.print("Connecting to ");
        Serial.print(WIFI_SSID);

        Serial.println();
        Serial.print("Connected to ");
        Serial.println(WIFI_SSID);
        Serial.print("IP Address is : ");
        Serial.println(WiFi.localIP());                                // print local IP address
        Firebase.begin(FIREBASE_HOST, FIREBASE_AUTH);                  // connect to firebase
        Firebase.reconnectWiFi(true);
        Firebase.set(firebaseData, "/LED_STATUS", "off");
        Firebase.set(firebaseData, "/COLOR", "");


        // Initialize five LED strips

        FastLED.addLeds<LED_TYPE, PIN1, COLOR_ORDER>(leds, NUM_LEDS).setCorrection( TypicalLEDStrip );


        FastLED.addLeds<LED_TYPE, PIN2, COLOR_ORDER>(leds, NUM_LEDS).setCorrection( TypicalLEDStrip );


        FastLED.addLeds<LED_TYPE, PIN3, COLOR_ORDER>(leds, NUM_LEDS).setCorrection( TypicalLEDStrip );


        FastLED.addLeds<LED_TYPE, PIN4, COLOR_ORDER>(leds, NUM_LEDS).setCorrection( TypicalLEDStrip );


        FastLED.addLeds<LED_TYPE, PIN5, COLOR_ORDER>(leds, NUM_LEDS).setCorrection( TypicalLEDStrip );
        FastLED.setBrightness(  BRIGHTNESS );

        // Begin in the "off" setting

        currentPalette = CRGBPalette16(CRGB::Black);
        fill_solid( currentPalette, 10, CRGB::Black);
    }


    void loop()
    {
        // Gone with the delay! Used millis() instead
        unsigned long currentMillis = millis();

        Firebase.get(firebaseData, "/LED_STATUS");                     // get led status input from firebase
        led_status = firebaseData.stringData();                        // change to e.g. intData() or boolData()
        Serial.println(led_status);

        Firebase.get(firebaseData, "/COLOR");
        hex = firebaseData.stringData();
        Serial.println(hex);

        if (led_status == "off") {                                     // compare the input of led status received from firebase

          if (currentMillis - previousMillis > interval) {             // save the last time you blinked the LED

            previousMillis = currentMillis;

            Serial.println("off");
            currentPalette = CRGBPalette16(CRGB::Black);               // solid black
            fill_solid( currentPalette, 10, CRGB::Black);

            static uint8_t startIndex = 0;
            startIndex = startIndex + 1;                               // startIndex increments control the speed (larger int = faster speed)

            FillLEDsFromPaletteColors( startIndex);

            FastLED.show();

          }
        }

        else if (led_status == "color") {
          if (currentMillis - previousMillis > interval) {
            Serial.println("color");

            long number = (long) strtol( &hex[1], NULL, 16);            // turn HEX string to RGB numbers
            int r = number >> 16;
            int g = number >> 8 & 0xFF;
            int b = number & 0xFF;

            currentPalette = CRGBPalette16(CRGB( r, g, b));
            fill_solid( currentPalette, 10, CRGB( r, g, b));
            static uint8_t startIndex = 0;
            startIndex = startIndex + 1;

            FillLEDsFromPaletteColors( startIndex);

            FastLED.show();
          }
        }

       else if (led_status == "romantic") {
          if (currentMillis - previousMillis > interval) {
            Serial.println("romantic");

            RomanticPalette();
            currentBlending = LINEARBLEND;                               // built-in light show styles

            static uint8_t startIndex = 0;
            startIndex = startIndex + 10;

            FillLEDsFromPaletteColors( startIndex);

            FastLED.show();
          }
        }

        else if (led_status == "vibes") {
          if (currentMillis - previousMillis > interval) {
            Serial.println("vibes");

            currentPalette = PartyColors_p;
            currentBlending = NOBLEND;

            static uint8_t startIndex = 0;
            startIndex = startIndex + 50;

            FillLEDsFromPaletteColors( startIndex);

            FastLED.show();
            }
        }


        else if (led_status == "sunrise") {
          if (currentMillis - previousMillis > interval) {
            Serial.println("sunrise");
            SunrisePalette();
            currentBlending = LINEARBLEND;
            static uint8_t startIndex = 0;
            startIndex = startIndex + 10;

            FillLEDsFromPaletteColors( startIndex);

            FastLED.show();
          }
        }

        else if (led_status == "chill") {
          if (currentMillis - previousMillis > interval) {
            Serial.println("chill");
            ChillPalette();
            currentBlending = LINEARBLEND;
            static uint8_t startIndex = 0;
            startIndex = startIndex + 10;

            FillLEDsFromPaletteColors( startIndex);

            FastLED.show();
          }
        }

        else if (led_status == "waves") {
          if (currentMillis - previousMillis > interval) {
            Serial.println("waves");
            currentPalette = OceanColors_p;
            currentBlending = LINEARBLEND;
            static uint8_t startIndex = 0;
            startIndex = startIndex + 10;

            FillLEDsFromPaletteColors( startIndex);

            FastLED.show();
          }
        }

        else if (led_status == "winter") {
          if (currentMillis - previousMillis > interval) {
            Serial.println("winter");
            WinterPalette();
            currentBlending = LINEARBLEND;
            static uint8_t startIndex = 0;
            startIndex = startIndex + 10;

            FillLEDsFromPaletteColors( startIndex);

            FastLED.show();
          }
        }

        else if (led_status == "christmas") {
          if (currentMillis - previousMillis > interval) {
            Serial.println("christmas");
            ChristmasPalette();
            currentBlending = LINEARBLEND;
            static uint8_t startIndex = 0;
            startIndex = startIndex + 10;

            FillLEDsFromPaletteColors( startIndex);

            FastLED.show();
          }
        }

        else if (led_status == "birthday") {
          if (currentMillis - previousMillis > interval) {
            Serial.println("birthday");
            BirthdayPalette();
            currentBlending = LINEARBLEND;
            static uint8_t startIndex = 0;
            startIndex = startIndex + 50;

            FillLEDsFromPaletteColors( startIndex);

            FastLED.show();
          }
        }

    }

    void FillLEDsFromPaletteColors( uint8_t colorIndex)
    {
        uint8_t brightness = 255;

        for (int i = 0; i < NUM_LEDS; ++i) {
            leds[i] = ColorFromPalette( currentPalette, colorIndex, brightness, currentBlending);
            colorIndex += 3;
        }
    }


    // There are several different palettes of colors demonstrated here.
    //
    // FastLED provides several 'preset' palettes: RainbowColors_p, RainbowStripeColors_p,
    // OceanColors_p, CloudColors_p, LavaColors_p, ForestColors_p, and PartyColors_p.
    //
    // Additionally, you can manually define your own color palettes, or you can write
    // code that creates color palettes on the fly.  All are shown here.

    void RomanticPalette()
    {
        CRGB color1 = CRGB(92, 10, 60);
        CRGB color2 = CRGB(121, 21, 81);
        CRGB color3 = CRGB(245, 111, 134);
        CRGB color4 = CRGB(210, 65, 117);
        CRGB color5 = CRGB(188, 52, 118);


        currentPalette = CRGBPalette16(
                                       color1, color2, color3, color4, color5,
                                       color1, color2, color3, color4, color5,
                                       color1, color2, color3, color4, color5,
                                       color1);
    }

    void WinterPalette()
    {
        CRGB color1 = CRGB(17, 60, 207);
        CRGB color2 = CRGB(191, 245, 253);
        CRGB color3 = CRGB(255, 255, 255);


        currentPalette = CRGBPalette16(
                                       color1, color2, color3,
                                       color1, color2, color3,
                                       color1, color2, color3,
                                       color1, color2, color3,
                                       color1, color2, color3,
                                       color1);
    }

    void SunrisePalette()
    {
        CRGB color1 = CRGB(183, 44, 60);
        CRGB color2 = CRGB(255, 154, 0);
        CRGB color3 = CRGB(255,77,0);
        CRGB color4 = CRGB(255,103,0);
        CRGB color5 = CRGB(255, 219, 0);


        currentPalette = CRGBPalette16(
                                       color1, color2, color3, color4, color5,
                                       color1, color2, color3, color4, color5,
                                       color1, color2, color3, color4, color5,
                                       color1);
    }

    void ChristmasPalette()
    {
        CRGB color1 = CRGB(255, 0, 0);
        CRGB color2 = CRGB(0, 255, 0);
        CRGB color3 = CRGB(202, 184, 81);


        currentPalette = CRGBPalette16(
                                       color1, color2, color3,
                                       color1, color2, color3,
                                       color1, color2, color3,
                                       color1, color2, color3,
                                       color1, color2, color3,
                                       color1);
    }

    void ChillPalette()
    {
        CRGB color1 = CRGB(57, 162, 174);
        CRGB color2 = CRGB(113, 196, 194);
        CRGB color3 = CRGB(227, 188, 181);


        currentPalette = CRGBPalette16(
                                       color1, color2, color3,
                                       color1, color2, color3,
                                       color1, color2, color3,
                                       color1, color2, color3,
                                       color1, color2, color3,
                                       color1);
    }

    void BirthdayPalette()
    {
        CRGB color1 = CRGB(21, 35, 194);
        CRGB color2 = CRGB(3, 120, 252);
        CRGB color3 = CRGB(90, 31, 189);
        CRGB color4 = CRGB(255, 165, 255);
        CRGB color5 = CRGB(173, 68, 249);


        currentPalette = CRGBPalette16(
                                       color1, color2, color3, color4, color5,
                                       color1, color2, color3, color4, color5,
                                       color1, color2, color3, color4, color5,
                                       color1);
    }
Now that I finished the code, I could upload it to the Huzzah, connect the USB cable to the portable battery, make sure my hotspot was turned on for the Huzzah to connect to, and start using the app with the device!